When I was about 7 years old, I had a friend with a Sony PlayStation game console. I'd go round to his house and occasionally play Crash Bandicoot, MediEvil, and whatever else he had at the time. The part that made the most impact upon me, however, was not the games themselves, but the sound sequence that was heard when the console booted.
If you're reading this, you're probably already quite familiar with what it consists of. Here's a primer video in case you're unaware which I recommend you view as it covers some of what we're going to look at. First there's a blaring synth lead, followed by some bells, another synth lead note, then a metallic swooshing sound with high-pitched bells, and then more bells at a lower pitch at the very end. I wanted to know how it does all this and decided to go searching.
I stumbled upon a thread on the Vintage Synthesizer Forum with everyone on there agreeing that the leading two notes sound just like "Spacious Sweep" from the Roland D-50, with someone even having gone as far as attempting to recreate the sound, albeit rather simply, on a hardware reissue of the D-50. No information was given about the other sounds we hear, so I did a bit more digging.
Extracting samples
I then found this thread on Romhacking.net that gives some very useful information as to how to extract the raw samples from a BIOS image. The first way is to extract the individual VAG (lol) samples from three individual locations:
`VAG addresses:
#1 - 000521E0 --> 00055670 #2 - 00055680 --> 00057310 #3 - 00057320 --> 0005CA40`
Select from the starting address in SCPH1001.BIN until the specified end address and use your hex editor's "save as file" feature to name them 1.vag etc. Alternately, you can follow Gemini's advice in that thread and select from 0x50FC0 to 0x5CA3F and save that as a single VAB instead with the three samples in it. If you don't want to use a hex editor, there's a simple Python program at the bottom of the page that will do it automatically.
Once you've extracted these, it's time to give them a listen. There are numerous programs that can open the VAB including Awave Studio, as well as PSound. For the VAG files, there's MFAudio. Remember that these are in ADPCM which may need to be changed in the program's settings before you'll hear anything.
Once you've figured out how to play these sounds in the above utilities, try changing the sampling rates up and down and replaying them. You'll soon have a vague idea of what the PlayStation SPU is doing when it boots in order to produce the full sequence from start to finish. You can then export them into standard PCM WAV and play around with them in a sampler or wave editor afterwards.
Examining with a debugger
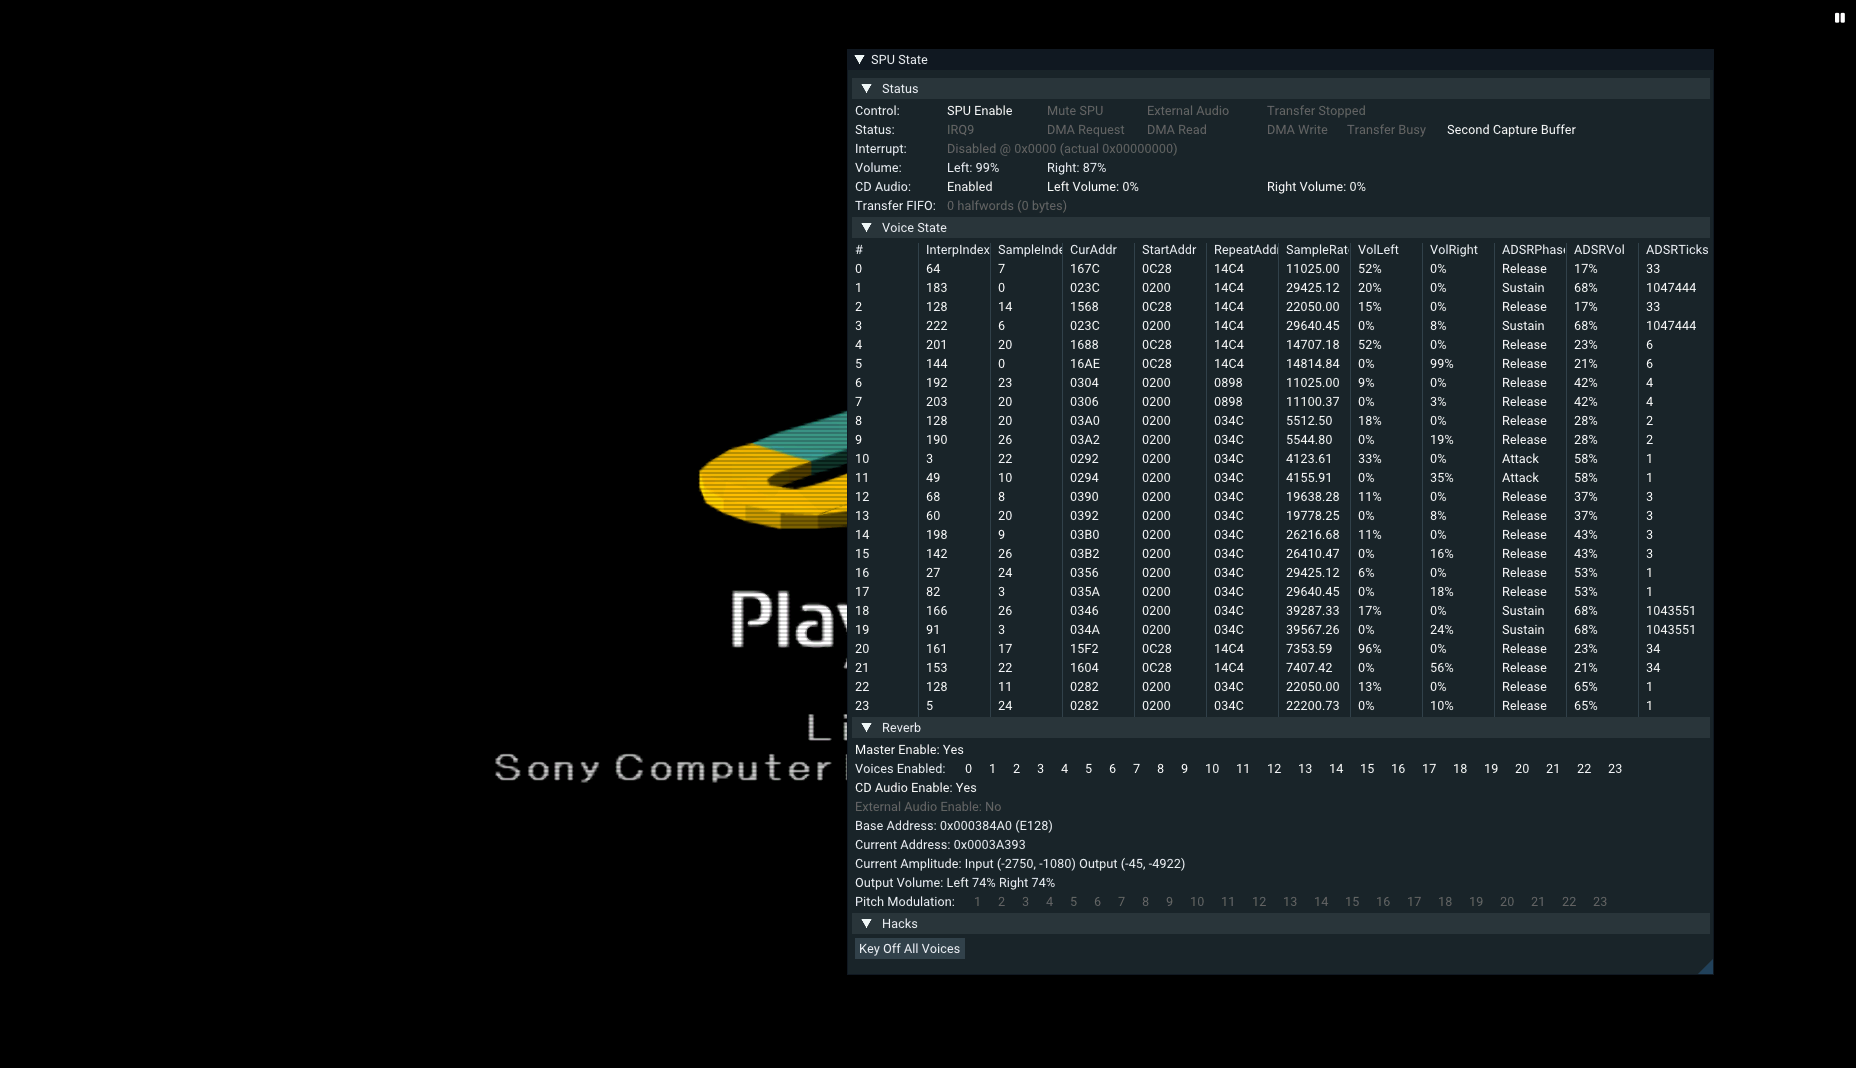
What amazed me at this point was that the entire sequence is comprised solely of these three mono samples, with everything else done by the PlayStation's SPU. I wanted to see in greater depth what it was actually doing to the samples, so I booted up DuckStation and turned on its debugging features, and then the SPU viewer, and set the emulation speed to be quite slow. Do note that I am not an expert on the PlayStation's internals so some of this may be an inaccurate interpretation.
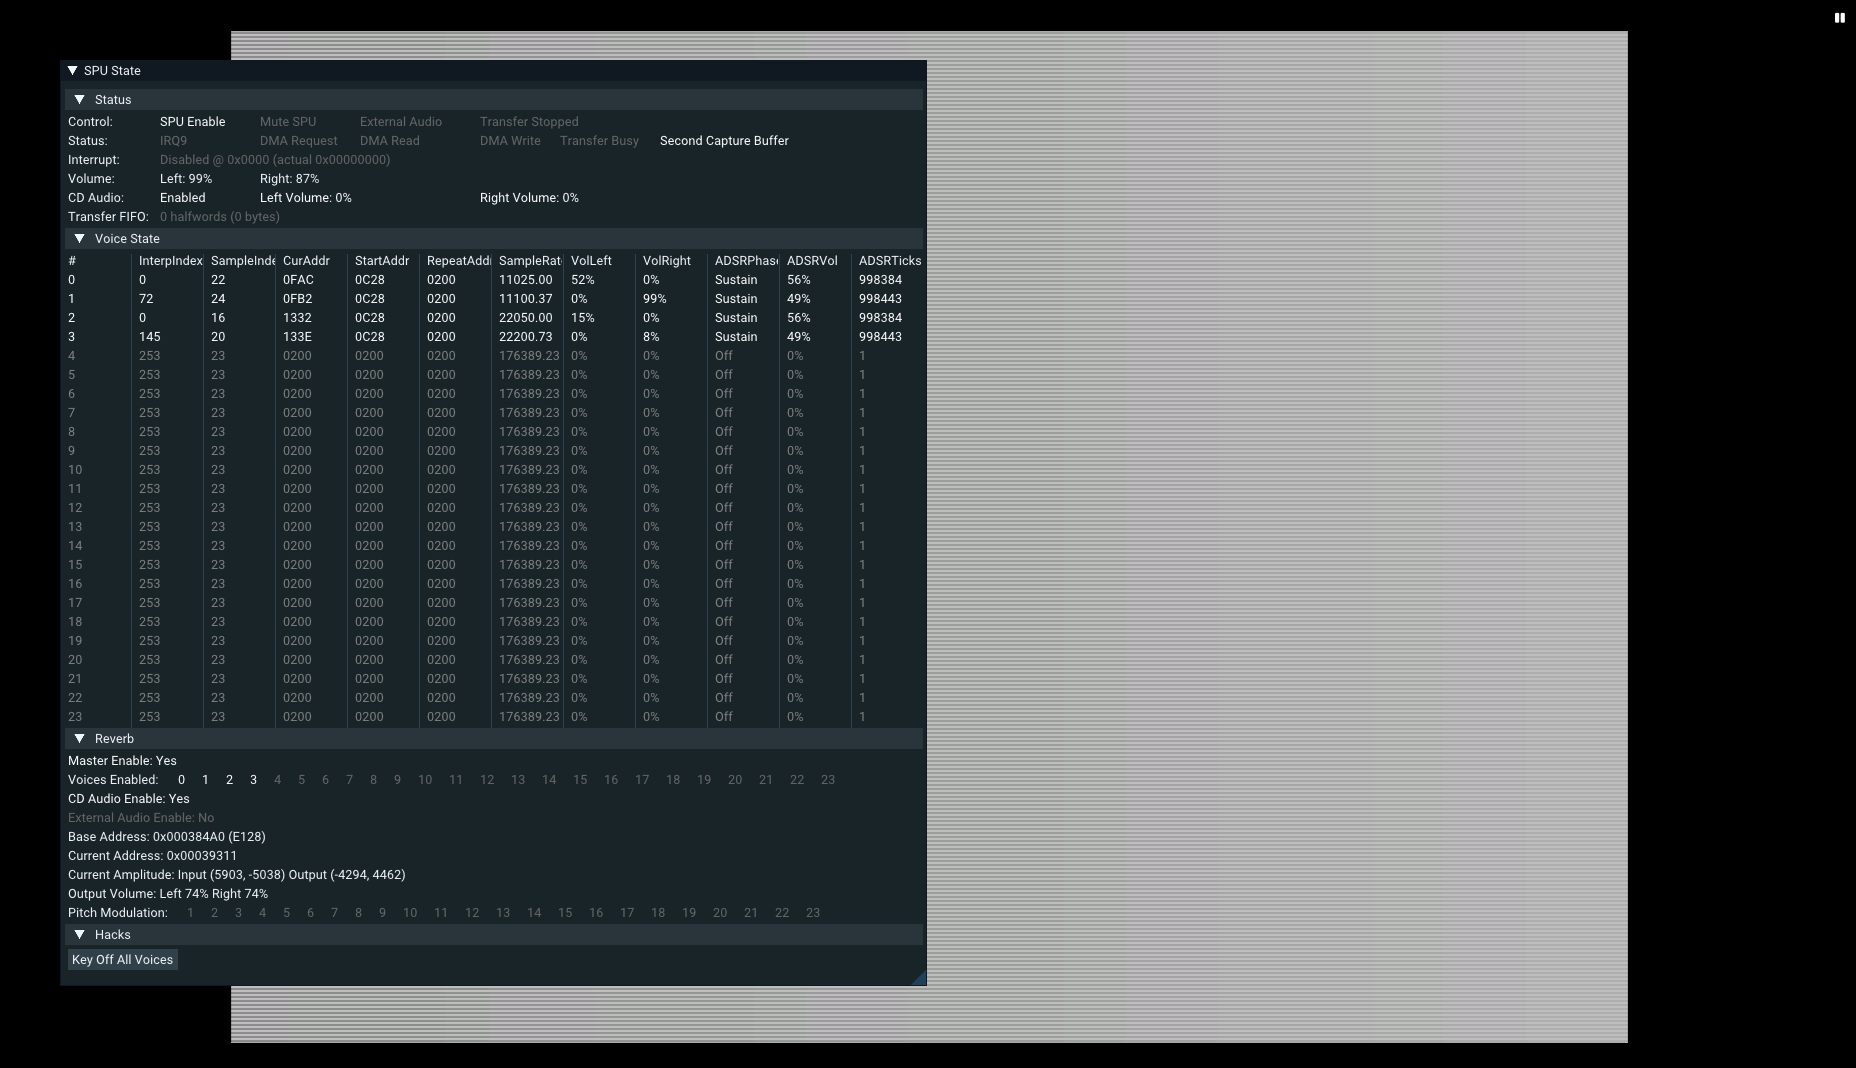
We can see immediately upon booting that the Spacious Sweep sample (Start Address 0C28) is loaded not just once, but four times, with the first instance of our leading note (at 11khz) being panned left, the second all the way right, and with a slightly different frequency so as to provide the stereo effect and prevent phase cancellation as well as give a subtle detuning. The SPU's reverb is also initialised and applied to all voices. The sample is simultaneously played and stereo'd at its native frequency (22khz), albeit quietly, and with a different repeat address.
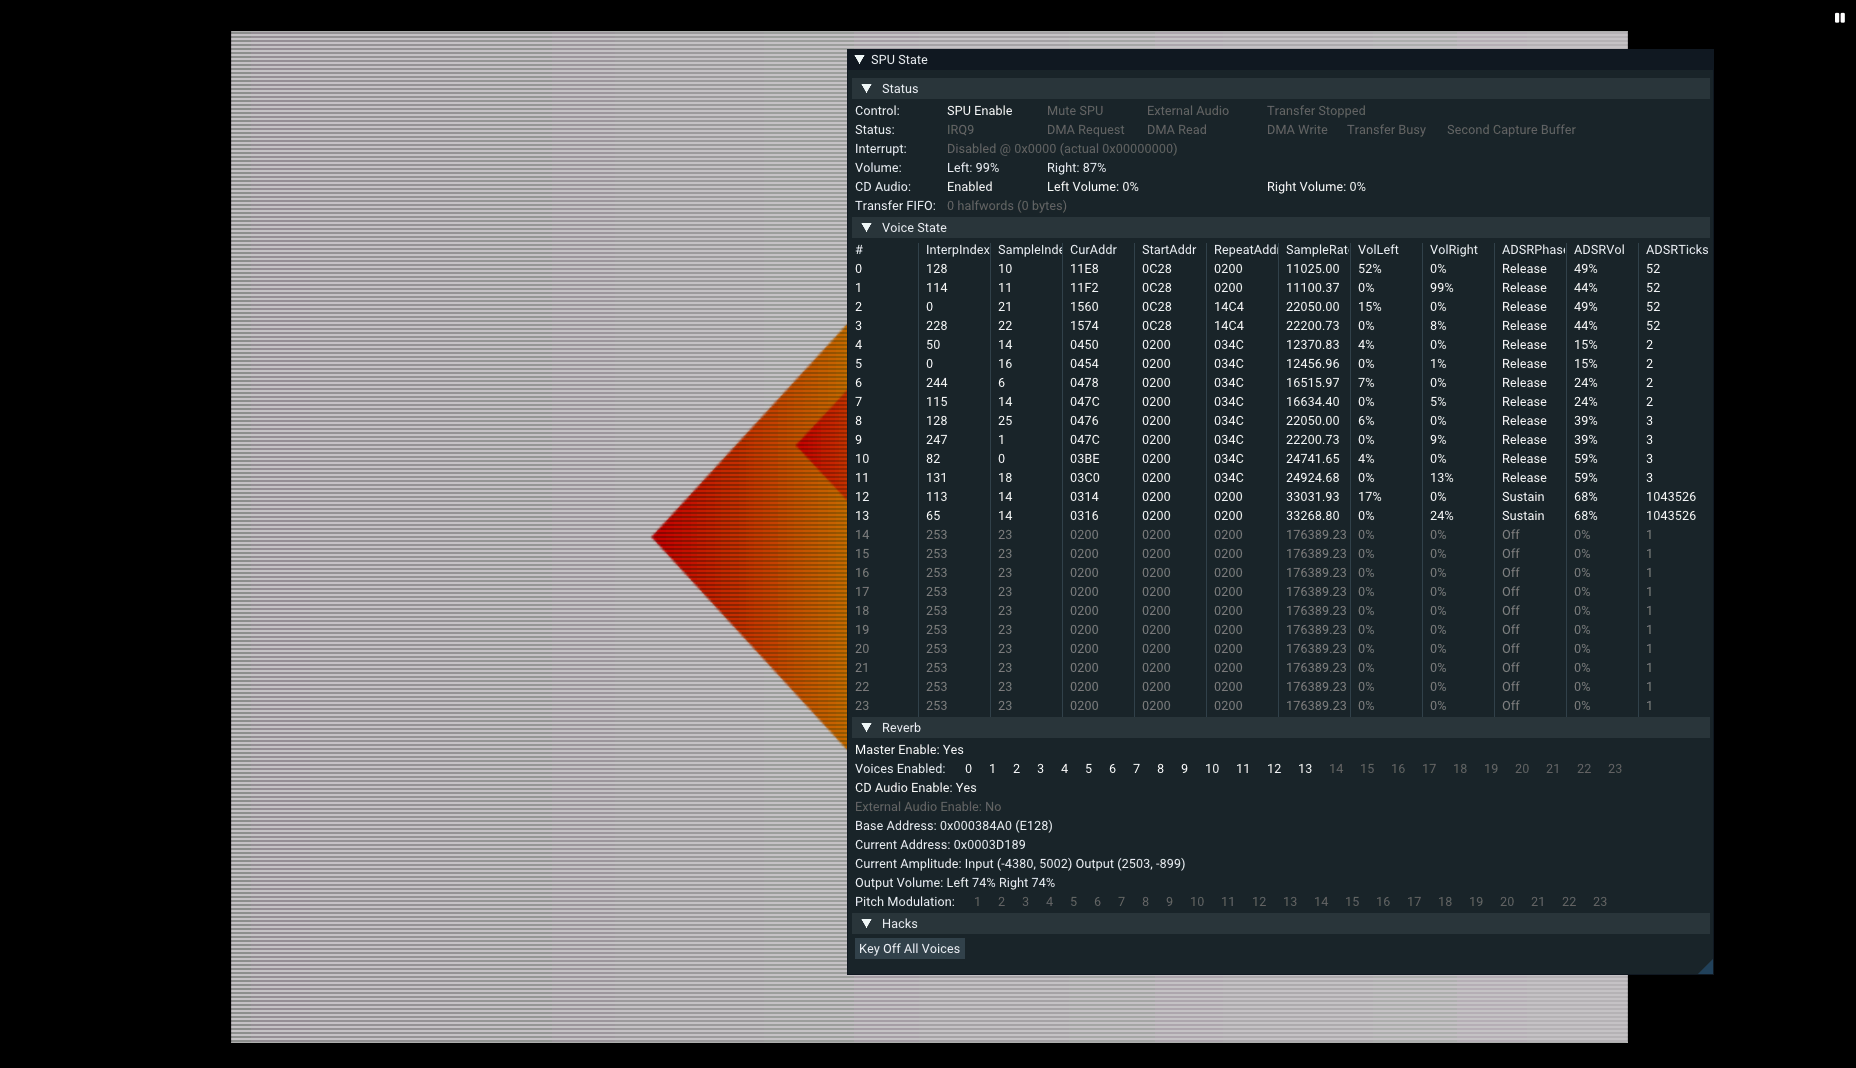
We're then presented with the second part of the overall sequence, the "twinkling bells" (Start Address 0200), which very quickly fill up the remaining voices of the SPU. As with the leading Spacious Sweep tone, the notes are panned so as to provide stereo sound. There's also a ton of ADSR wizardry going on in this part which was probably hand-coded in MIPS assembly.
Partway through the twinkling bells, the second note of Spacious Sweep is heard in voices 20 and 21 at around 7000Hz. This is a few tones down from the first (G to C) and like the first instance, has a complementing note at double the frequency. The initial note is still playing at this point in the release phase of the ADSR envelope repeating the loop point near the end of the sample. If you do not have a CD in your console, this is about as much as you'll hear before the inbuilt CD player and memory card manager launches. Interestingly enough, the samples will still be playing at this screen with their volume set to zero. If a disc is found, however, we instead go to the PlayStation logo screen and the next part of the audio sequence.
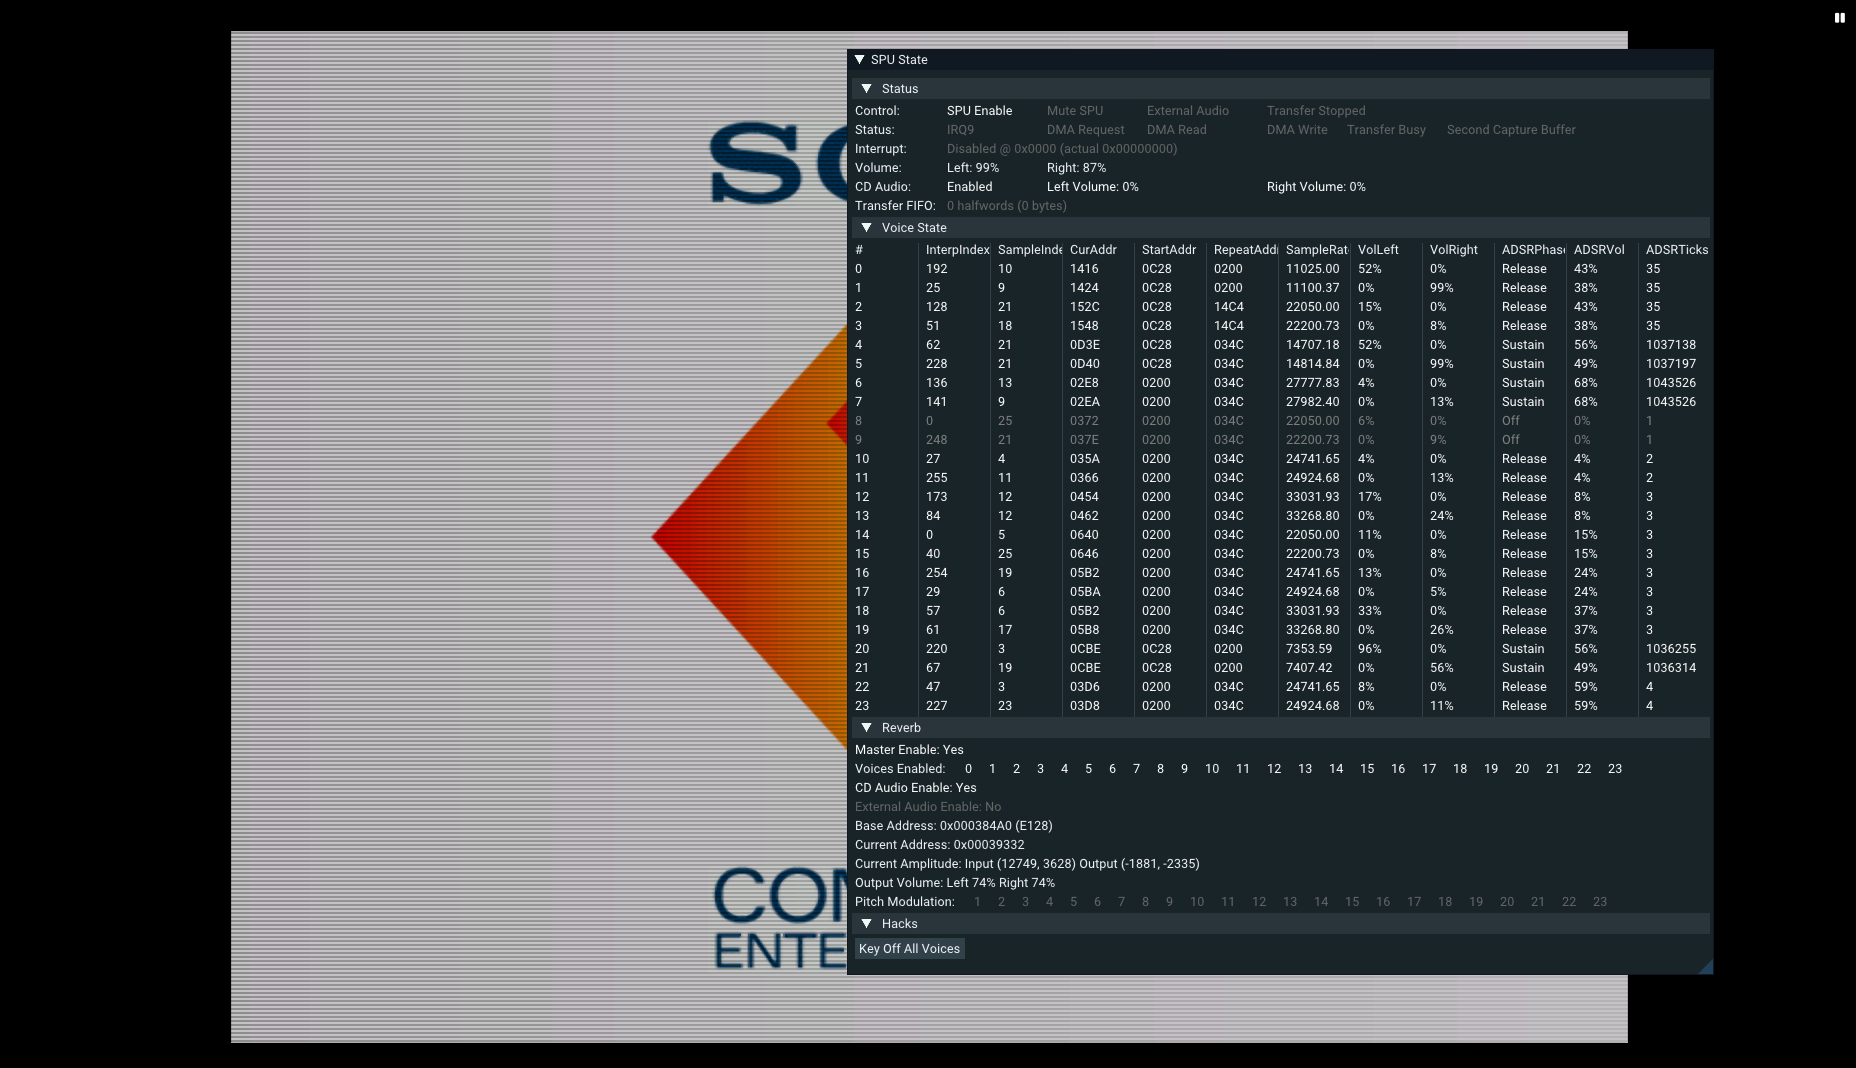
At this point, the two Spacious Sweep notes are still playing, but now we're greeted by the swooshing sample (Start Address 0894) which is again loaded into two slots with panning so as to provide a stereo effect. We also get to hear the "bell cacophony" and can see that bell samples (0200) are being reloaded in order to play them.
This section plays incredibly fast and uses up all the remaining empty voices. Spacious Sweep is still playing in 6 slots along with "swoosh" in 2, with the remaining 16 given to the 7 or 8 bell notes which have a very fast ADSR envelope. Like the previous bells, each individual tone is panned with different amounts.
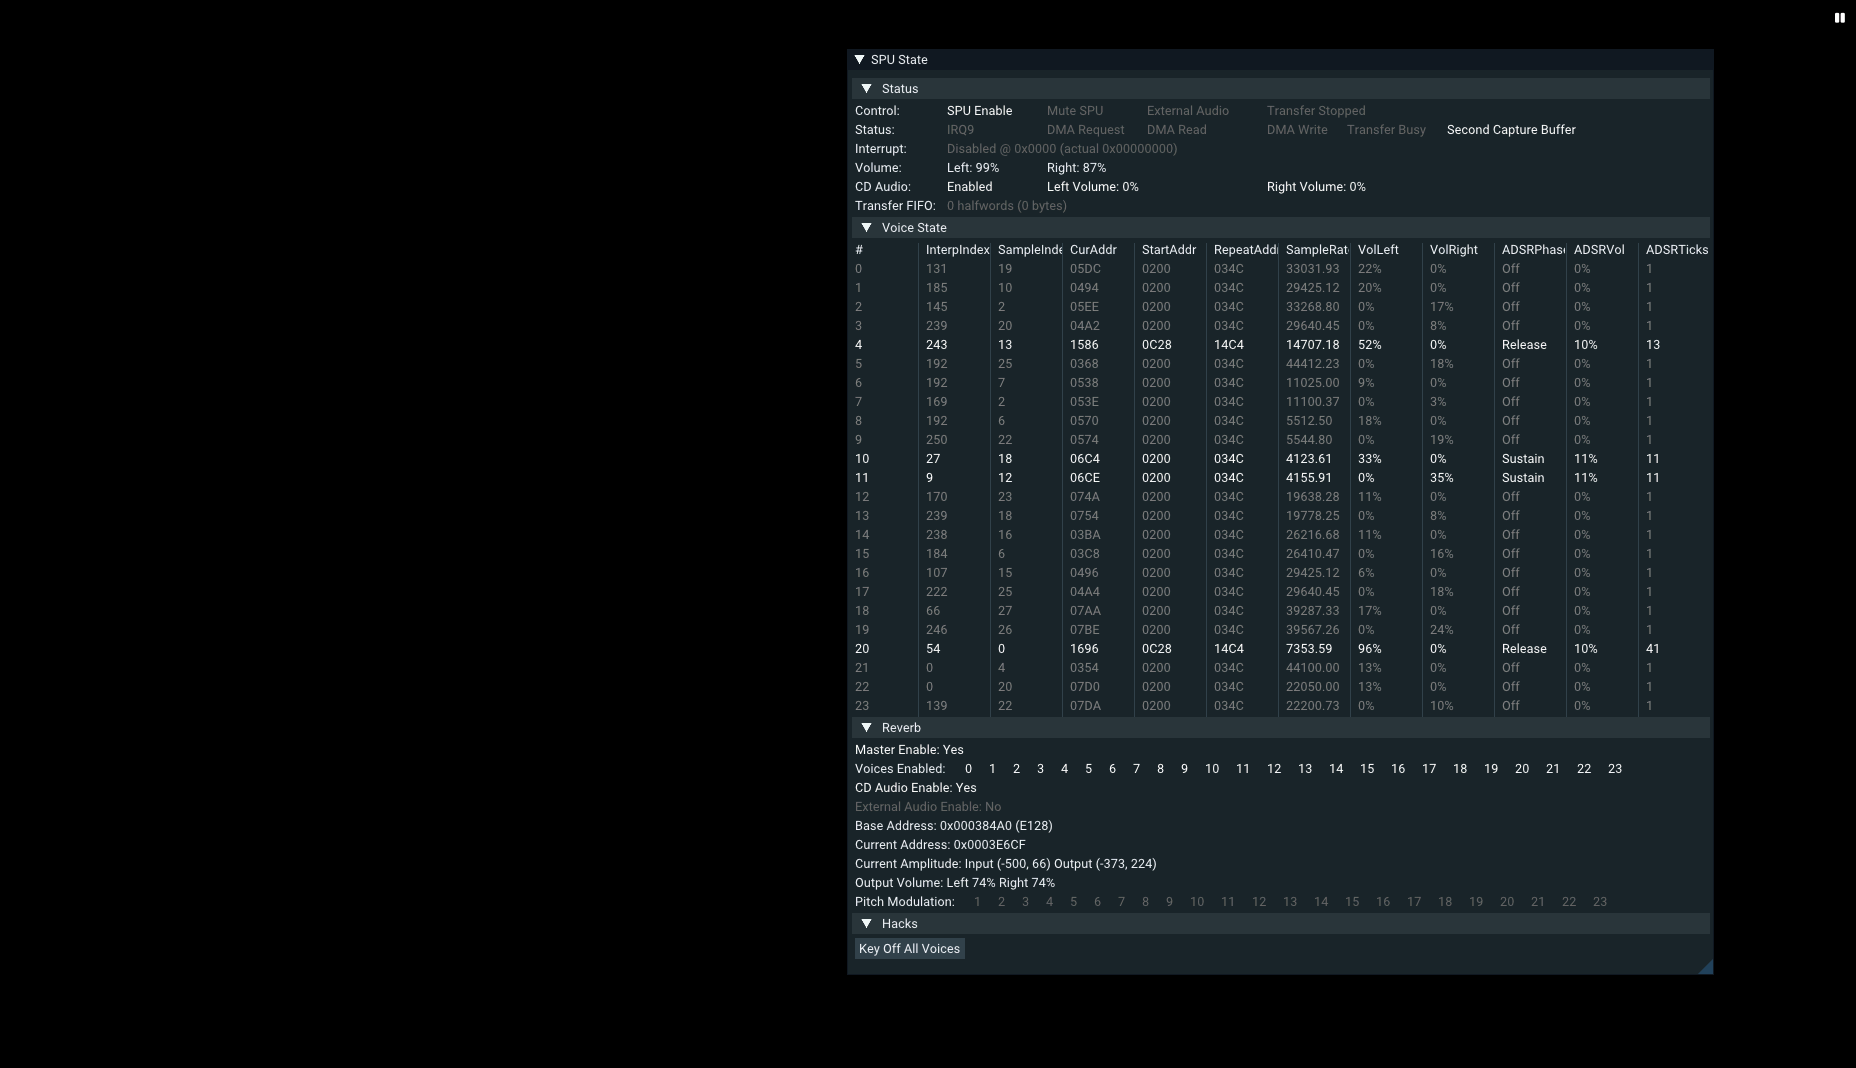
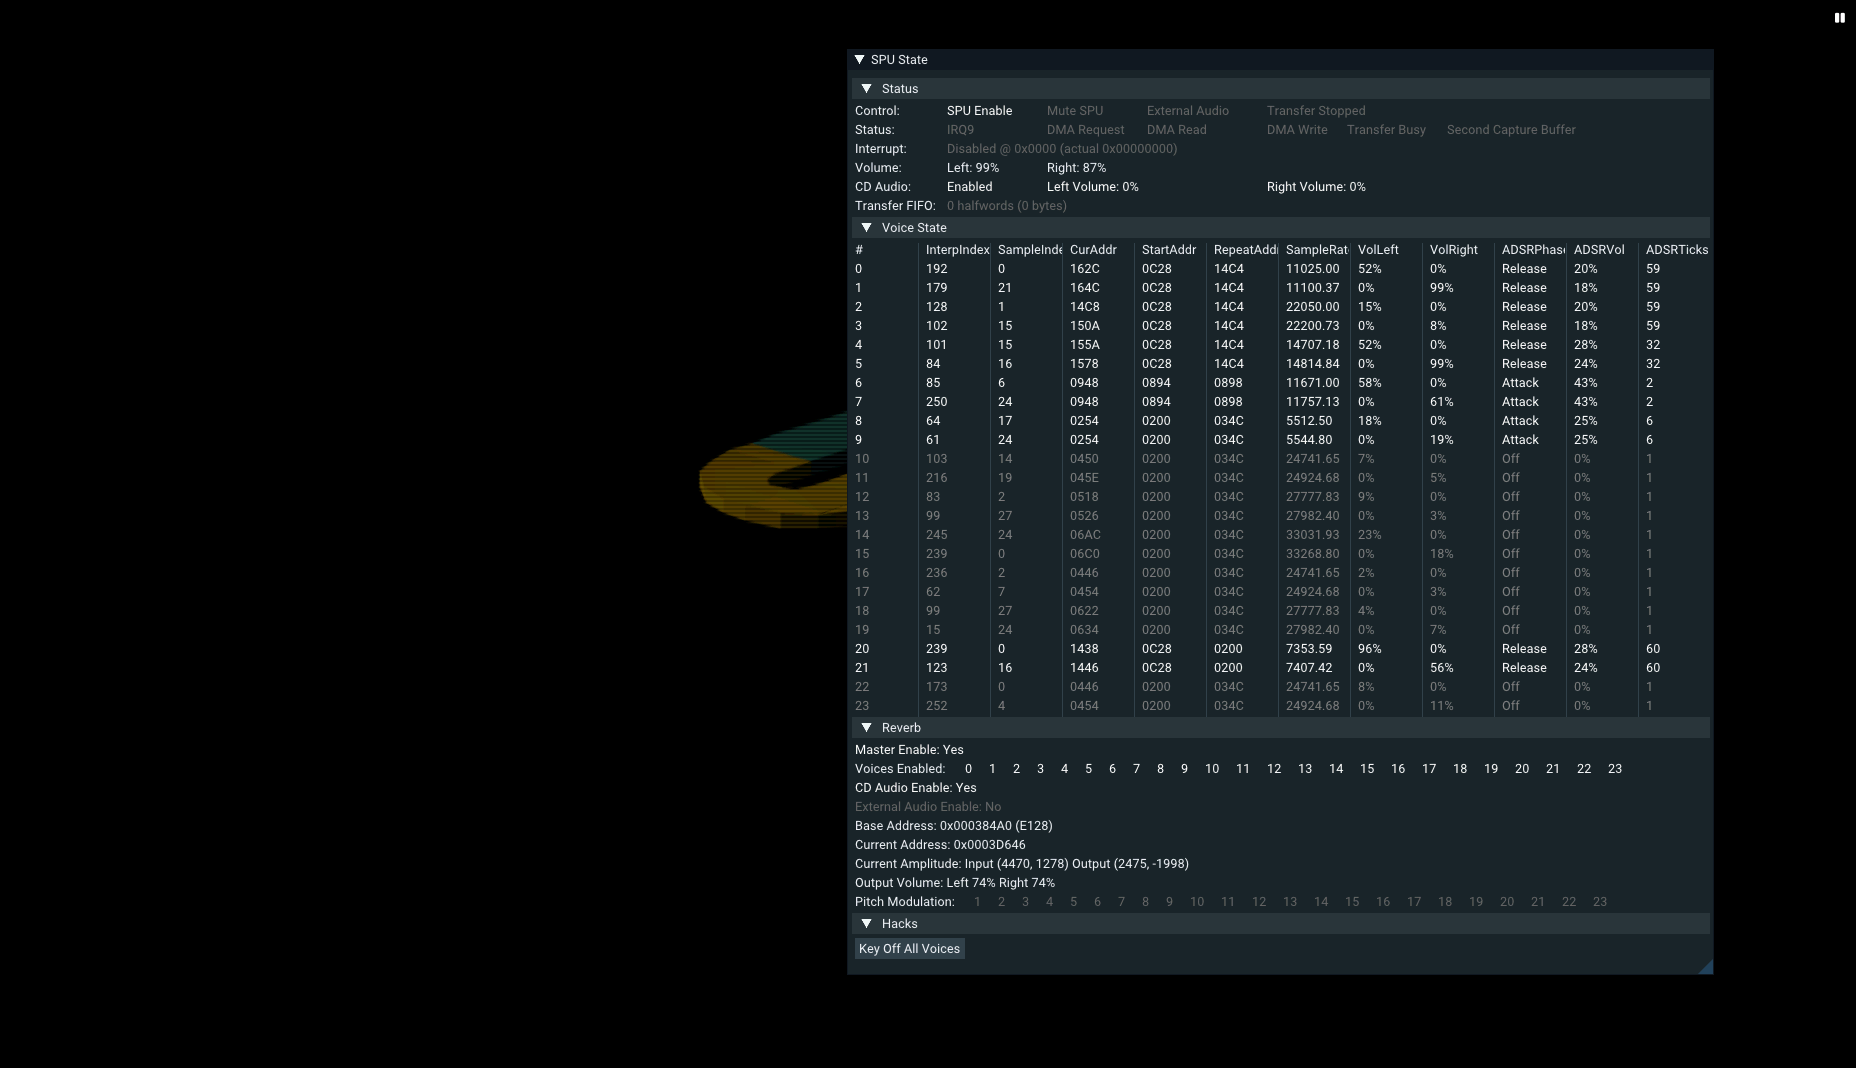
At the very end, we can see Spacious Sweep is still going, with the most prominent tone being the new low-pitched bell. This is simply the bell sample played much more slowly at around 4000Hz with the usual pan and detune. In the case of a scratched or dirty CD, it'll repeat the glass and low bell while the console hurriedly tries to start the disc.
Recreating in a DAW
Spacious Sweep
Now that we know what it consists of, we can go about attempting to replicate it. The first part is very easy due to Roland releasing a VST instrument of the D-50 which has all of the factory patches including Spacious Sweep. Load it up in your DAW of choice (I use Reaper) and play a G note in a lower octave, followed by a C. You'll notice that it does sound slightly different due to the lack of SPU reverb. For fun, you can run the BIOS in ePSXe without reverb on to hear the entire sequence dry. Thankfully there is an SPU reverb VST plugin out there that you can slot into your FX chain. Even then, you may want to alter Spacious Sweep's filter and ADSR parameters slightly, and perhaps turn off the plugin's reverb.
Bells
The next part is the bells. Just exactly which bell patch was used isn't evident, as the sample is so short and generic that it's difficult to tell exactly which one it could be. The D-50 has "Gamelan Bells" as well as "Oriental Bells" which don't sound quite right, but the Korg M1 also has a few bell sounds of its own such as "Bell Ring" which I ended up using. Find a bell sound that works well in higher octaves and then attempt the twinkling bells part. It repeats a fair bit, but this behaviour could be imitated with a delay instead. The sample itself is a sequence of several notes (C, E♭, G, B♭), but for this section it seems that only the first note from the sample is apparent, with a sharp decay used to cut out the rest of it. It starts on G and then runs to C, D, and then G in the octave above before changing to C and then an arpeggiated C major chord. To assist with hearing it more clearly, you can hit "Key off all voice" in DuckStation's SPU viewer after the first note of Spacious Sweep.
Swoosh
Following the two notes of Spacious Sweep and the twinkling bells, we have the swooshing sound. If you exported the VAB into a wave editor and played around with it you would have probably noticed something very interesting. Reverse it, and slow it down, and you'll realise it's a glass breaking! There are numerous broken glass sound effects out there, but to my ears, it sounds like GLASMASH from the Fairlight CMI. The CMI samples ended up in many romplers of the era so it could be from just about any of those. There are numerous suitable replacements, including SlowGlass.wav from Rarefaction's "A Poke in the Ear With a Sharp Stick" if you're looking for a Silent Hill vibe, or Sonniss GDC which has a few as well.
Arturia make a VST instrument of the CMI, but this didn't work for me as I am still on Windows 7 and it requires 8.1 or newer. Instead I managed to find the original samples on the Internet Archive which includes GLASMASH.WAV in EFFECTS4. Load it into your sampler of choice, reverse it, and perhaps double it and add panning. You may also need to tweak the ADSR parameters and add filtering in order for it to sound authentic enough.
More bells and outro
Simultaneously with the broken glass swoosh, more bells come in. This is probably the most difficult part to get right due to the incredible speed the tones play at, and because the frequencies they play at don't tend to match up with notes in the standard equal tempered tuning meaning you may have to apply pitch bending to some of them in order to make them sound just right.
Python program for extracting the VAB
from sys import argv

if argv[1]:
    with open(argv[1], "rb") as f:
        f.seek(int(0x50FC0), 0)
        vab = f.read(47743)
        with open("psxvab.vab", "wb") as o:
            o.write(vab)
else:
    print("Supply SCPH1001.bin as an argument")
from sys import argv
if argv[1]:
with open(argv[1], "rb") as f:
f.seek(int(0x50FC0), 0)
vab = f.read(47743)
with open("psxvab.vab", "wb") as o:
o.write(vab)
else:
print("Supply SCPH1001.bin as an argument")This is an extremely simple Python 3 program that will read your BIOS image and output a file named PSXVAB.VAB. As it uses no external dependencies it should work on just about every Python 3 interpreter out there. Save it to a file names biosvab.py alongside your BIOS image and invoke it with python3 biosvab.py SCPH1001.bin or py -3 on Windows.